
Thesis Blog: Some Bitching on the MT9D111 Image Sensor Coding
 |
| MT9D111 SOC image sensor from On Semi |
My Life
I won't be lying to you if I said I love myself. I am a proven hedonist and I have learned to gravitate towards luxuries that the physical space around me has to offer. I like how my senses are drawn towards sensual, sexual and unearthly pleasures and I feel quite content that I have just enough resources to keep up with that lifestyle.
It's a nice, calm, fuzzy feeling, knowing yourself. You should try that sometimes.
But then there are those times where I look at myself and contemplate whether I deserve to exist in the first place. I was out today for another round of field testing for my impending thesis. Boy was I excited; I had just somehow figured out what was wrong with the code, had managed to get to the bottom of it and actually get results. For selecting the location of the field test, I simply gaze up into the tallest building there is in our university then pack up the lab laptop, camera, and the electrical ground support equipment (egse) and head straight up.
Everything was fine. Took me a while to get up there and even more-while to get the equipment set-up. Everything looked just I had thought it would, the weather was favorable, and I had just to power up the laptop. I press the laptop power button and the damn piece of shit won't turn on. Before leaving the lab, I had thought about checking the battery but I simply decided not to. What was worse was that I had ALSO decided to leave the power plug behind because it was too heavy.
Heavy my butt-hole. Good thing they had ramen downstairs for dinner.
Anyways, that's not the point of this blog here. In recent times, as you will see here [HERE], I have been testing my camera in outdoor setting to see if it can take images in ultra-bright conditions which basically mimics taking earth images from space. The issue came when I realized that I was getting plain white images, and by that I mean saturated, useless, lifeless images.
In other words, if you were to take images of heaven, that would be it. At this moment in time, taking images of heaven is not my top priority.
My Love: The MT9D111 Image Sensor
Before you go on and read the rest of the blog, I assume that you have a certain degree of understanding on:
1) Registers
2) Data Sheets and knowing how to read them
3) Addresses and I2Cs
4) Beer making.
1) Registers
2) Data Sheets and knowing how to read them
3) Addresses and I2Cs
4) Beer making.
and interest on
1) Image Sensors
1) Image Sensors
2) Coding
If not, this upcoming portion will only be waste of your time.
So where was I, yes the MT9D111 sensor. The sensor is a 2M (1600 X 1200) pixel image sensor. To be honest, the sensor is quite old. The datasheet still mentions Micron and the company ceased to exist after Apitna bought it. What's worse, On Semi then went on to buy Aptina so you can see that the sensor is anything but new.
The reason for selecting such an old sensor for our CubeSat(ellite) was largely dependent on the availability of the sensor rather than selecting a sensor strictly based on performance. The market had it, the datasheets were available, there were codes out there that could be used and they also had the developer's guide available.
Try getting all these for a new sensor and you will know how painfully difficult it is to get your hands on spare change sensors.
Anyways, the point here is that even though MT9D111 is an old sensor, the sensor itself is pretty advanced. The packaging comes along with a SOC (System on Chip) which basically means that along with the sensor core and PLL (Phase-Lock Loop), the sensor has an MCU, ROM and RAM built in.
My initial thought was that this would make things easy. However, it didn't take me long to realize that getting the configurations just about right wasn't all that straight forward after all.
As I had outlined [HERE], I was having trouble controlling the auto-brightness target. The lower the target I would set, the darker the image should have been. However, even though I would lower the value, no tangible effect would appear on the image. No darkening, just plain ol' white picture.
Looking Deeper into Registers
MT9D111 sensor has two contexts; Context A is preview and Context B is capture. Preview is basically preview, consumes low power, is set at a lower resolution by default and is designed to run at higher frame rates. Context B on the other hand, is used when an image has to be captured. So when you boot up the camera, the camera is on Context A by default. You preview the image in front of you to get the idea of what you expect if you "trigger" and take a picture. When you push the trigger though, the software has to understand that and change the Context to B and get the image.
For me, changing the context is not necessary. I want the camera to consume less power (Context A) and I can set it at even lower resolution (QQVGA) with an even lower frame rate. My processor's camera interface can then latch on to these previewed images and store a frame. Easy peasy.
Well, that's what I had thought. Until I tried to change some of the default characteristics of the Context A.
 |
| MT9D111 Boot Sequence |
While Context A (Preview) and Context B (Capture) was well understood, I still had problems understanding what the sub-chapters to Context A and B. Preview is not just preview but has different stages; Enter Preview, In Preview and Leave Preview. The same for capture. EACH have their own autobrightness, autofocus, auto white balance registers which means each sub-chapter has its own settings for auto-brightness, auto-focus and so on.
Was I setting up registry values for In Preview and getting picture out from Enter Preview stage? Because I had just previously assumed that I was taking picture out from Context A without giving much thought to the different sub-context. I could have well be taking images from Enter, In or Leave Preview.
As I mentioned before, since the image sensor is advanced, the sensor has a shit load of registers to deal with:
they have the IFP (Image Flow Processor) registers, the MCU registers, the RAM registers and so on. Then you have registers which have 8-bit and 16-bit R/W space. Depending on that, the way you address it different.
they have the IFP (Image Flow Processor) registers, the MCU registers, the RAM registers and so on. Then you have registers which have 8-bit and 16-bit R/W space. Depending on that, the way you address it different.
To give you an example, let's look at the register which tells me which sub-context I am in.


To access the state register in Sequencer Driver, I have to first understand what type the register is. Says, uchar which is 8 bit. Then I have to check the driver ID which is 1. then check the offset which is 0x04 (4). So to access this, I have to first:
1) Write 0xA104 to 0xC6 register. 0xA comes from 8-bit, 0x1 comes from ID and 0x04 comes from the offset. To understand the process, click [HERE] and go to Registers and Variables
2) Then I have to Read from 0xC8 to get the default 3 value. Btw, this is all through the I2C, which means I have already taken the device address into consideration before doing all of this.
yeah sucks balls, I only properly got that yesterday. the uchar(8-bit) and uint(16-bit) was perhaps the one i neglected the most.
When I did that though, the read value returned 0x02 which means mode 2 which means Enter Preview. Little did I know that I was changing brightness values for In-Preview and getting images from Enter-Preview. See where the problem was? Quite tricky.
So to make sure that I get image out from In-Preview state, I simply added this following line:
Read = MT9D111_I2C_MCURead(0xA1, 0x04); //Read State
while (Read<3)
{
/* Loop till state is in In-Preview */
Read = MT9D111_I2C_MCURead(0xA1, 0x04);
}
As you can see, I wait till the state changes from 2 (Enter Preview) to 3 (In-Preview). Once the image sensor initializes to state 3, I then command the processor to stalk on my image sensor and extract out a frame.
Results
 |
| Auto Brightness target lowered down. The tubelight is visible on the left. |
 |
| Reducing AB target would now enable taking brighter condition pictures outside |
Without delving into too much details, I basically changed the value of the register that defined Auto Brightness target and the results were finally tangible. I still have problems with Auto White Balance settings but I guess I can't complain much at the moment.
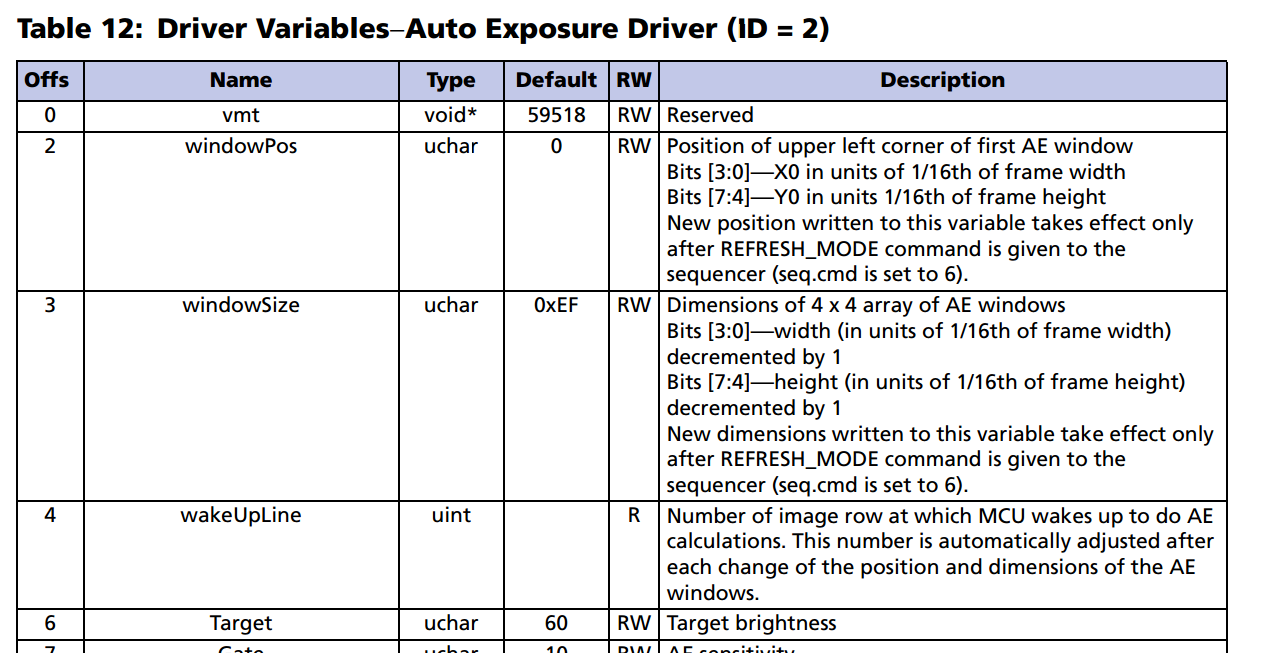 |
| Target brightness register at offset 0x06 (6) |
Which brings us back to the story where I go on a top of a building to take an outdoor picture only to find that the laptop had no juice on it. Look's like it will rain tomorrow but google says it will calm down a bit at the afternoon.
All I have to do now is to make sure that the sucker is charged up and up to the task for tomorrow.


Thank you for sharing these nice tips with us. I've been trying to make an OV9655 camera module work with a STM32F4-Discovery board it's been 7 months now. At this point, I have image being displayed on a 3.2" TFT LCD display and I can save the picture with 320x240 pixels resolution in an uSD-card via SPI. The image saved on the uSD-card is not perfect, though. It comes with some distorted regions.
ReplyDeleteMy professor needs a camera with higher resolution, thus I started working with the MT9D111 and I'll have to increase the resolution of the output image as well. I've been reading your posts and I feel familiar with many of your struggles cause I've faced and still face many of them.
Yeah man, cameras are very painful to work with. The datasheets can be tricky. Hope things work out with you alright.
DeleteThe best advice is to keep going. Something always works eventually.
985A92F1B3
ReplyDeletekiralık hacker
hacker arıyorum
kiralık hacker
hacker arıyorum
belek
9CBCCECF23
ReplyDeleteSex Hattı
Görüntülü Sex
Görüntülü Show Uygulamaları
6901F6AC
ReplyDeleteForum
Forum
Forum
Forum
Forum
Forum
Forum
Forum
Forum